Our integration packages provide a complete turn key solution for using IdentityServer4, making it very easy for you to provision a complete solution for OpenId Connect.
We have pre-built integration for using cloudscribe Core as the user management back end for IdentityServer4, including UI for managing the operational data for clients, api resources, and identity resources. What IdentityServer4 brings to the table is handling for OpenId Connect protocols and the ability to issue JWT tokens for authentication and authorization. JWT authentication can be used for SPA style (Single Page Application) web applications that talk to web APIs, and even for mobile app authentication.
Use of IdentityServer4 is a complex topic, to learn about it you should visit the excellent IdentityServer4 documentation.
To get started using cloudscribe with IdentityServer4, you should use our project template for Visual Studio or the .NET Core CLI as discussed in Introduction to cloudscribe, and check the box to include IdentityServer4 integration.
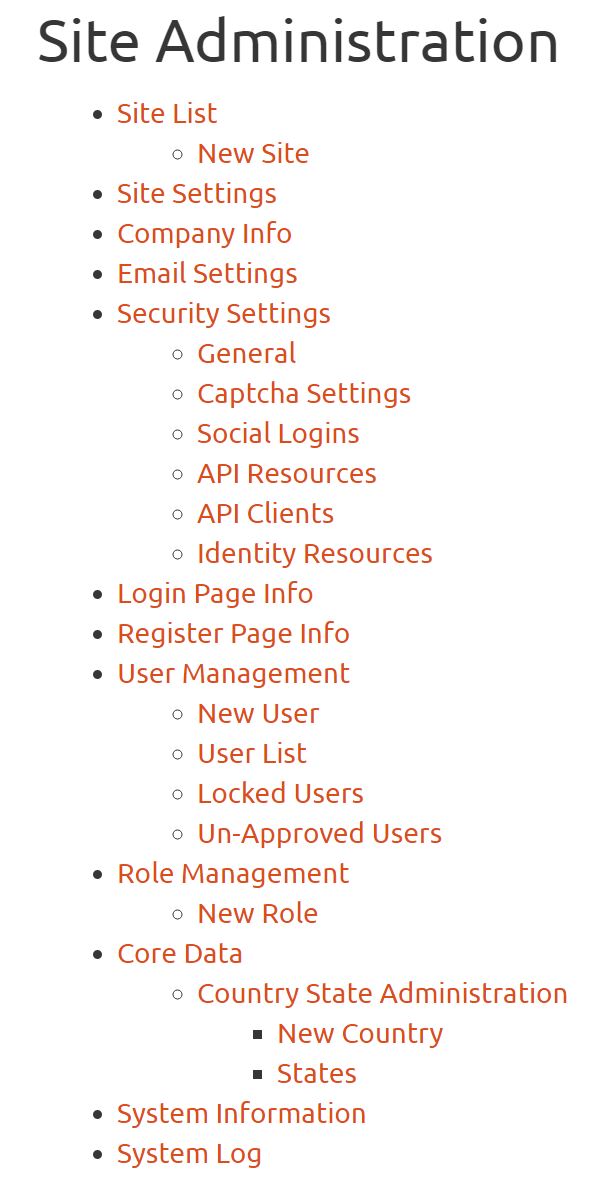
After you create your project see the readme.html file which has information about the login credentials and next steps. When you login as administrator a new Administration Menu item will appear. Most of what you see in the image below is standard menu items for cloudscribe Core, but there are 3 additional menu items under the Security Settings that are added for the IdentityServer4 integration. Specifically the API Resources, API Clients, and Identity Resources menu items are for creating and managing the operational data for IdentityServer4.
Note also that there are additional appsettings to configure when using our IdentityServer4 integration, to allow the server to use your X.509 certificate (which can be self-signed):
"AppSettings": {
// etc other settings
"IdServerSigningCertPath": "D:\\path-to-your-X.509-certificate\\your-X.509-certificate.pfx",
"IdServerSigningCertPassword": "password-for-your-X.509-certificate"
    }
There are other settings required to support API clients, and change to make in IdentityServerIntegration.cs (documentation in prep).
Notes on configuring a cloudscribe site to act as an identity provider for other cloudscribe site(s)
These notes might help configure a simple scenario in which one cloudscribe site will act as the identity provider for one or more other applications (which may themselves be using cloudscribe or other platforms that support OIDC).
The 'Server' site requires the X.509 certificate present and configured as described above.
Server - API Clients
On the server site, you will need to add an API Client for each external application/website. For each API client you add, the following configuration should work.
The Id can be any unique string.
The Name will appear when the user is asked for consent, if requiring consent is configured.
The Client Uri can be left empty.
Access Token Type is not relevant here - leave alone.
Refresh Token Expiration is not relevant here - leave alone.
Refresh Token Usage is not relevant here - leave alone.
Logo Uri - if configured to point at a value path to an image, this image will be displayed in the dialogue when the user is asked for consent, if requiring consent is configured.
Front Channel Logout Uri - this is needed for effective logout; for a cloudscribe client it is https://your-client-site.com/signout-callback-oidc
Back Channel Logout Uri can be left blank.
Lifetime settings - the default values are fine.
Client Claims Prefix - the default client_ can be left alone.
Pairwise Subject Salt can be left blank.
Checkboxes:
Enabled - switch this on.
Enable Local Login - switch this on.
Require Consent - this on if you want the end user to be prompted to give consent for the sign-in process to access their credentials on the server site. Probably this would be switched off in any organisational context, but on when the client application is operating under different service terms and conditions from the server.
Allow Remember Consent - if Require Consent is on, this determines whether consent can be given once and remembered, or whether it is needed every time.
Require Pkce - this must be off at present (cloudscribe 6.0) as it is not supported with hybrid grant type.
Require Client Secret - if this is off, it is not necessary to configure and share a secret at server and client. If this is on, the secret must be added at the server and used in configuration at the client - this is more secure.
Always Include User Claims In Id Token - documentation in preparation. This can be off.
Allow Access Tokens Via Browser - documentation in preparation. This can be off.
Always Send Client Claims - documentation in preparation. This can be off.
Include Jwt Id - documentation in preparation. This can be off.
Logout Session Required - documentation in preparation. This can be off.
Update Access Token Claims On Refresh - documentation in preparation. This can be off.
Allow Offline Access - documentation in preparation. This can be off.
Redirect Urls - this is needed; for a cloudscribe client it is https://your-client-site.com/signin-oidc
Post Logout Redirect Urls - this can be the root of the client site, e.g. https://your-client-site.com/
Allowed CORS Origins - this can be left empty if the client is authenticating from server-side code, as in a cloudscribe site.
Client Secrets - if you switch on Require Client Secret above, you need to make a client secret and enter this into the configuration of the client site. You should choose Sha256 or Sha512 hash options, type = SharedSecret, and note the Value before clicking "Add Secret" as it is the original value that is needed at the client. Set an expiration date if desired.
Claims - documentation in preparation - can be left empty.
Allowed Grant Types: add 'hybrid'. Note that 'authorization_code' is not currently supported.
Allowed Scopes - add each of the following: openid,email,profile. These will also be configured as the OpenIdConnect Scopes in the client.
Provider Restrictions - documentation in preparation - can be left empty.
Custom Properties - documentation in preparation - can be left empty.
In Identity Resources
Add three identity resources: openid (required = yes), email (required = yes), profile; set 'enabled' and 'show in discovery document' = yes for all. For the email resource, add Claim 'email'.
Client configuration
Configuration of a client application/website that supports OIDC should now be straightforward!
If it is a cloudscribe site, see our documentation here.
The OpenIdConnect Authority Url should be the root address of the Server cloudscribe site, e.g. https://your-server-site.com/
The OpenIdConnect Display Name determines what end users will see on the client site's log in screen, so should be a user-friendly description, like 'Acme Corp Id', or 'Log in with Acme'.
The OpenIdConnect App Id must match the API Client Id that you configured above.
OpenIdConnect App Secret is required only if Require Client Secret is switched on at the server.
OpenIdConnect Scopes (comma separated) should be set to 'openid,email,profile'
With server and client settings like this, it should be possible to log into the client cloudscribe site by clicking 'Log in with Acme', then enter credentials at the Server site, after which you will be redirected back to the client site 'signed in'. If you didn't already have an account in the client site, you will have one now, though it may also be subject to approval, depending on site settings.
If the Server API Client record is configured to require consent, then an intermediate screen will appear after clicking 'Log in with Acme', asking for consent in line with server configuration, and showing the configured logo and Name of the API Client as configured in the Server.
Can the Server itself use OIDC?
Yes! Note that the only requirement is that the user can authenticate at the server site. So this authentication can use any supported method of authentication in a cloudscribe site, which can include Facebook, Google, Twitter, or OIDC. So this means the the cloudscribe Identity Server site can itself be cascading authentication from other providers.
Sample solution for API clients
If you have any trouble getting your clients and APIs working, you can take a look at the sample solution in our sample repo: cloudscribe-idserver-nodb - this uses NoDb file system storage for data. We don't recommend using NoDb storage to start your own IdentityServer application because NoDb is meant for small sites and IdentityServer is more targeted for having lots of users - you should use one of the other 3 data storage options for production use. But this one makes a good demo because NoDb made it easy for me to create a demo with sample data already included. It is pre-configured with data and has working clients already set up for 2 tenants, so it demonstrates our multi-tenancy support. There is also a working Xamarin sample client in this repository, see the YouTube Video below for a guided tour. If you are having any trouble getting things working with your clients and APIs this can serve as a good reference for you to compare how you have things setup vs this working example.
Note that Social Authentication in cloudscribe Core integrates seamlessly with IdentityServer4, so if you setup social authentication, your client applications can also sign in using social authentication providers.
Note also that if you have configured cloudscribe to use LDAP authentication, then any requests for an access token made against cloudscribe's IdentityServer4 authentication endpoint will validate the supplied credentials by attempting to login both against the standard cloudscribe user tables and then (if that fails) against the configured LDAP domain settings.
Some notes on logging out
When logging your client application out, you should use the IdentityServer4 'endsession' endpoint (see documentation) as shown:
https://yoursite.com/connect/endsession?id_token_hint=[abc]&post_logout_redirect_uri=https://mycallback.com
where:
yoursite.com is the domain of your cloudscribe IdentityServer4 host,
[abc] is replaced by the lengthy id_token that will have been returned to your app following its earlier authorization request: Authorize Endpoint — IdentityServer4 documentation
and https://mycallback.com is replaced with the URL that you wish to return to after a successful logout (for example, this may be a callback to your client xamarin app).
The callback URL must have been registered for your client as a supported Post Logout Redirect Url, in the 'API Clients' section of the cloudscribe administration settings.
If all of the above is configured correctly, then the client will be automatically logged out of the IdentityServer4 session, and automatically re-routed to the callback URL.
If no valid Post Logout Redirect Url is provided, the user will be taken to cloudscribe's own /account/logout view, and prompted to logout manually.
To learn more about cloudscribe, please see the rest of our documentation.